
Beyond the Sensor: Why the Final Edit is Photography’s Unspoken Power

When you join a photography workshop or attend a masterclass, the curriculum almost always follows a predictable blueprint: mastering your exposure triangle, dialling in shutter speed, compositional rules like the Golden Ratio, and chasing the ideal golden hour light.
Those fundamentals are essential. But they only get you halfway across the finish line.
What is almost universally glossed over in education is the final stage of artistic intent: the edit.
A RAW file is not a finished piece of art; it is a digital canvas rich with raw data waiting for a vision. Getting the exposure, composition, and light right in camera gives you a solid foundation, but thoughtful, intentional editing is where a photograph finds its soul, all without relying on AI shortcuts or digital manipulation.
To see this principle in action, let us look at a frame taken at Staffin on the Isle of Skye.
Case Study: Staffin, Isle of Skye
The Raw Potential (106.jpeg)
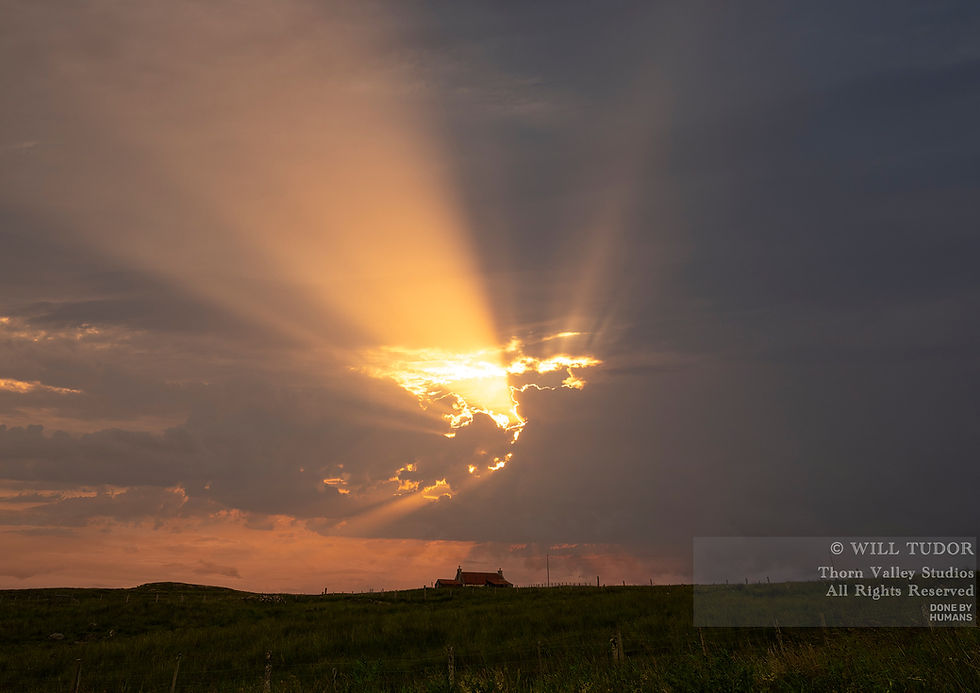
In the original capture (106.jpeg), all the raw elements are present.
The light bursting through the cloud break creates a dramatic burst of crepuscular rays, and the silhouette of the cottage against the Skye landscape anchors the base.
However, straight out of camera, the image feels flatter than the moment felt in real life:
Muted Tones: The fiery light in the sky is washed out by default camera profile interpretation.
Distracting Foreground: The muted, flat greens in the lower field pull focus away from the dramatic sky, weakening the visual hierarchy.
Diffused Drama: The contrast between the brilliant light rays and the storm clouds behind them is softened.
The Vision Realised (107.jpeg)
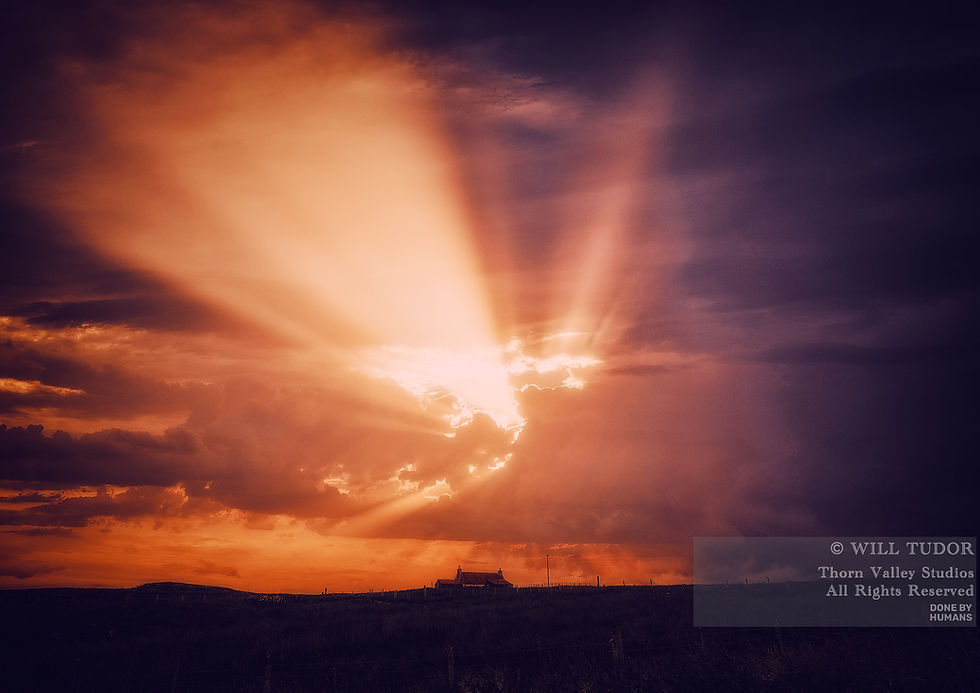
In the final image (107.jpeg), deliberate manual adjustments bring out the atmosphere and emotion that the camera sensor could not fully capture on its own.
Here is how the edit elevates the frame using classic developing techniques, with no generative AI or synthetic elements required:
Colour and Warmth Calibration:
The colour temperature was pushed to reflect the true warmth of the sun breaking through rain clouds. Rich oranges, deep ambers, and fiery copper hues now dominate the focal light burst.
Dynamic Tone Shaping:
Deepened shadows in the clouds emphasise the contrast against the sunbeams, making the shafts of light feel heavy, physical, and dramatic.
Intentional Vignetting and Foreground Anchor:
By dropping the exposure in the foreground and sweeping a subtle vignette across the frame, the low lying cottage is pulled into a dark silhouette. This grounds the scene and directs the viewer's eyes immediately up into the sky.
Atmospheric Contrast:
Targeted contrast adjustments accentuate the radial glow of the light rays, creating a sense of depth and scale.
Deconstructing the Edit: Step by Step Technical Breakdown
To demonstrate that dynamic editing relies on human intent rather than generative tools, here is the exact non destructive workflow used to transform the Staffin RAW file into the final image.
Whether you work in Capture One or Adobe Lightroom, the underlying visual principles remain identical.
Phase 1: Base RAW Processing
The primary goal of Phase 1 is to balance the massive dynamic range, rescuing blown out highlight details around the sun-break while lifting shadow details in the terrain.
White Balance: Capture One Kelvin set to 4126K (Lightroom equivalent: Temp slider reduced to around 4100K–4150K). This retains the cool, stormy undertones while maintaining warmth in the light break.
High Dynamic Range: Highlights -48 and Shadows +28 in Capture One (Lightroom Tone Panel: Highlights -48 and Shadows +28). Pulling back highlights recovers delicate light shafts around the sun, while lifting shadows reveals subtle structural details in the cottage and field without washing out the blacks.
Clarity, Texture, and Micro Contrast: Clarity +10 and Structure +40 in Capture One (Lightroom equivalent: Clarity +10, Texture +20 to +25). The heavy boost in Structure adds bite and definition to the cloud edges, giving the sunbeams a physical, tactile presence.
Fine Sharpening: Amount 115, Radius 0.4, and Threshold 0.2 in Capture One (Lightroom equivalent: Amount 115, Radius 0.5, Detail 25, and Masking 10). A low radius with higher sharpening keeps fine structural lines crisp without introducing coarse digital artefacts or noise across the smooth atmospheric gradients.
Colour Grading and Style Blending: In Capture One, Infinite Peaks Style (Smoky) applied at 25%, Nordic Editorial Style (Oslo) applied at 25%, and Rectangular Vignette set to -1.18 (Lightroom equivalent: Apply low opacity custom presets at 25% Amount, combined with a -15 to -20 Lens Vignette to draw focus inward).
Phase 2: Atmospheric Depth via Nik Collection (Color Efex Pro 5)
Once the raw data is balanced, the image is passed into Color Efex Pro 5 to shape optical mist, glow, and localised contrast:
ClearView: Set to 27% intensity to carve out distinct separation between the rays of light.
Fog Filter (Method 2): Set to 49% Opacity and 66% Blend to reintroduce a soft, dreamy luminescence around the sun flare so the contrast does not feel overly harsh.
Pro Contrast and Vignette: Used to fine tune the global contrast curve and further darken the lower third of the image, locking attention onto the light breaking over the cottage.
Phase 3: Final Colour Harmonisation
Returning to Capture One for the final polish, subtle colour blending is applied to stitch the atmospheric warmth of the sky with the cool tones of the landscape. This creates a seamless transition between the dramatic sky and the grounded earth below.
Craft over Automation: Done by Humans
In an era flooded with one click AI sky replacements and synthetic generative tools, manual darkroom style editing remains a vital skill. Editing is not about faking a moment; it is about translating what it felt like to stand on that windswept hill in Staffin when the light broke through.
A camera sensor sees pixels and luminance values; an artist sees atmosphere, mood, and story. Mastering your camera gets you to the scene, but mastering the edit ensures your voice carries all the way through to the final image.
Master the Full Craft with Thorn Valley Studios
Ready to take your photography beyond the camera body?
At Thorn Valley Studios, our workshops and masterclasses go beyond standard camera settings. We teach the complete artistic journey: from reading dramatic light in the field to mastering darkroom style post processing that brings your RAW files to life without artificial tricks.
Explore our upcoming workshop schedule and secure your place to start crafting images that truly match your vision.


Comments